DIY Decorations With Wood Slices – Part 2

The following blogs will be a three-part series where we can dive into some great DIYs using some leftover branches and create some artful wood slices decor.

Welcome back to the continuation of last month’s blog! Let’s dive in and go over some great DIYs for leftover branches. This month we move up a level and show you some great wood decoration DIYs with medium-sized wood slices. Of course, you can do the same thing we suggested the previous month, but having a bigger canvas means there is more space to spread the creativity.

As mentioned before, you can get some wood turning blanks we sell here that would need to be sliced. They are medium-sized -between 4 – 5 inches in Diameter. You can also find them on AmazonMichaels and with luck, at Walmart.

Using Medium Wood Slices

Let’s raise the stakes. Lest use bigger wood slices to decorate your home, make a biggerer statement and make them part of your house’s style.

Coasters

Just like decorating the smaller pieces, you can watercolor or sharpie them up, but now you have a bigger canvas and we can get more creative. Wood image transfer is a great way to skip the sketching and get a Picasso image right in your coaster. For this DIY you will need:

  • Medium-sized wood slices 3-4 inches in Diameter.
  • Wax paper
  • Regular printing paper
  • Tape
  • Plastic gift card
  1. First, cut a piece of wax paper that is the same size as the regular printing pager.
  2. Then overlap the wax paper on top of the regular paper. Holding it vertically, move the wax paper down about half an inch and fold it back. Tape the fold to the back securely. This bottom part will be the part of the paper that will go into the printer first, the tape secures the wax paper from moving around. However you feed your printer, make sure that the wax paper is the side that will get the ink. This variates from printer to printer.
  3. Arrange your images in a Word document making sure they will fit inside your 3-4 inch diameter of space.
  4. Before printing, damp the side of your wood slices where you will place the image.
  5. Print your images and then carefully cut around them. Make sure not to touch the inch because it will smudge.
  6. Place your cutouts upside down and gently rub the ink onto the wood with the plastic gift card. Avoid taking away or moving the image because it can smudge.
  7. You can sand away any part of the image you don’t like, like a smudge or a background color.

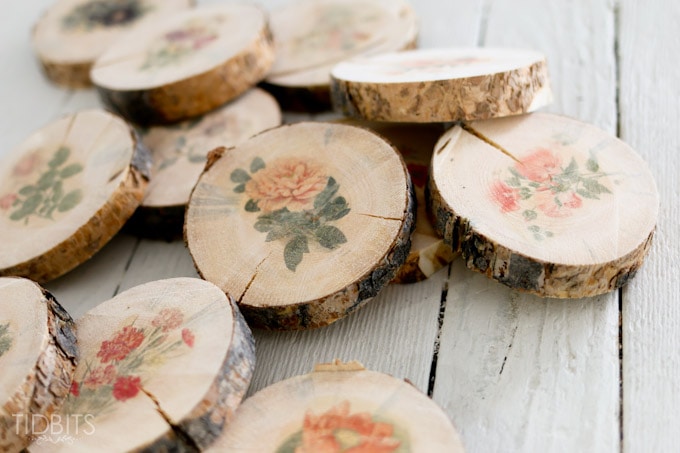
You can find the original DIY here.

String Art Ornaments

This kind of DIY can be a simple afternoon activity for your kids or it can become your weekend project. this activity can be as simple as or as elaborated as your creativity. For this DIY you will need:

  1. Lightly sketch the outline of the shape you want to make with your string art.
  2. Lightly mark dots where you want your nails to be. For some figures the nails would go in the angles/points -for instance, a star but, for rounder figures -for example, a heart, multiple nails along the edge will create the shape of the figure. You can play with figures and the number of nails in and around your shape and can even create an even bigger design in a bigger piece of wood.
  3. When you’re setting the nails make sure to not go all the way through the wood. make sure to leave some space but the nails are secure enough to hold in place.
  4. Knot a piece of thread around one of the nails.
  5. Wind the thread around the nails. Follow the path, cross over, create a pattern with the string lines, go crazy and let your creativity flow and add multiple color strings.
  6. When finished, tie another knot around a nail and trim the excess string. To avoid coming undone, dab a little school glue on it to hold it in place.
  7. Screw a small eye hook into the top of the wood slice and string a ribbon circle so it can be hanged.

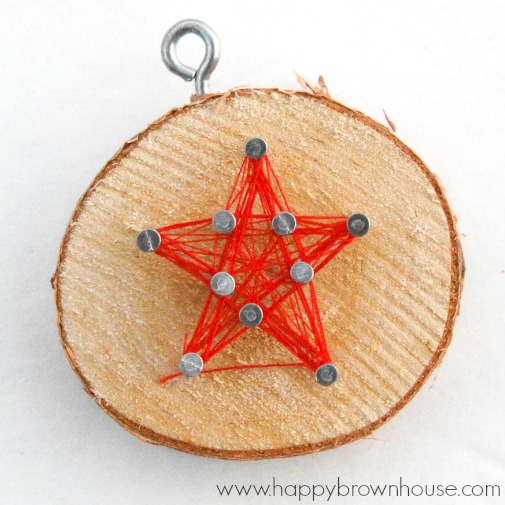
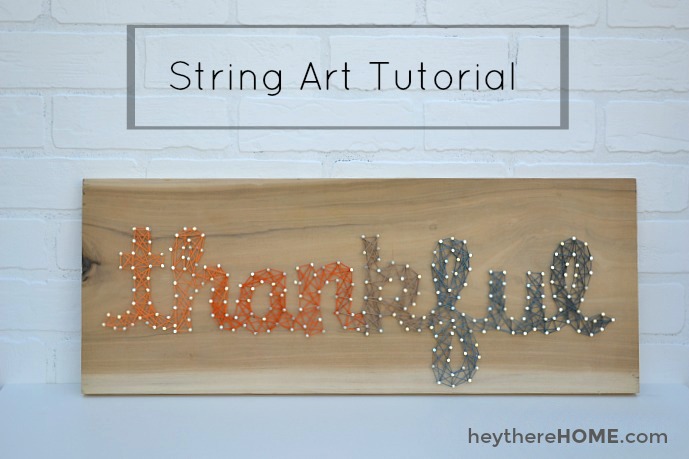
Aside from wall or Christmas tree decorations, you can put all these wood slices together. Instead of screwing a small hook to it, you can nail all the decorations together and make a wreath like in this Finding Home Farms tutorial. You can take this idea and develop it even more with this creative sign from Hey There Home.


Mesquite Wood Stair Parts & Components

Mesquite wood displays rich character and color not found in other hardwoods. The handsome appearance, unparalleled strength and rustic Texas style complete a grand entrance for any stairway. Faifer and Company, Inc supplies a full range of artfully-crafted mesquite wood stair parts to complete simple and elaborate staircases of all varieties.

Faifer and Company’s mesquite wood selections are reclaimed pieces from Texas ranchlands, carefully chosen for their aged charm and inimitable detail. The individual pieces combine to create a striking impression and complementary Texas motif in your foyer, living room or basement. An extensive selection of sizes with nosings, risers and reducers allows you to create any staircase and fulfill your unique elevation, height and aesthetic requirements.

Browse the stair gallery to take a closer look at completed mesquite wood staircases. See the parts listed below to start building your staircase and contact Faifer and Company Inc. for distinctive wooden stair treads and risers in Texas.

Stair Gallery

Mesquite Nosings – 1 1/16″ x 3 ½” x Random Length – Mill Run

Mesquite Risers – 3/4″ x 8″ x Random Length – Mill Run

Mesquite Treads – 1 1/16″ x 12″ x Random Length – Mill Run

Mesquite Reducers – ½” x 3” x Random Length – Mill Run

Mesquite T-Moulding- ½” x 1 7/8” x Random Length – Mill Run

Mesquite Flooring Basic Installation

Concrete Sub‐floor Glue Down

  • Moisture test concrete sub‐floor.
  • Float floor flat to ¼” inch in an 8 foot radius
  • Using a 1/8”x¼”x¼” square notched trowel, spread adhesive over a 2 foot by 2 foot area. Install planks in adhesive and continue process until entire area is installed.
  • Roll floor with 50 lb. To 80 lb. roller to make sure adhesive makes good contact with flooring. Do not allow traffic for a minimum of 8 hours on floor or as recommended by Manufacturer of adhesive.
  • Let adhesive set up overnight before starting the sanding process.
  • Sand with 60 grit paper to flatten.
  • Apply Filler (Wood Flour with floor sawdust mix) or you can use cherry or black walnut wood fill to fill cracks. If filling large cracks and knots you can use System Three epoxy for a more natural appearance.
  • Sand with 80 grit to flatten filler, finish with 120 grit.
  • Seal floor with floor polyurethane such as Dura Seal, Waterlox or Tung Oil per manufactures recommendations

Hardwood Flooring Grade Description

Strip Wood Flooring

#1 and Better

Will have clear and possibly small knots, checks and other natural defects allowed, along with the natural varying color of the wood. Sapwood is not allowed on finished surfaces. Lengths vary from 9 inches to 48 inches with tongue and groove. Ends are square cut. On average the lengths will vary between 16″ – 22″.

Mill Run

Will have semi clear, small to large knots, checks and other natural defects allowed, along with the natural varying color of the wood. Sapwood is not allowed on finished surfaces. Lengths vary from 9 inches to 48 inches with tongue and groove. Ends are square cut. On average the lengths will vary between 16″ – 22″.

End Grain Flooring

Wood Blocks – Only one grade available.  Knots, checks and other natural defects are allowed. Partly filled with black epoxy.  Width is 3 inches and lengths from 2 inches to 5 inches.

Products are 1/2 inch in thickness.
All material is of 100% South Texas origin.

Mesquite Wood Flooring Hardness & Stability

Relative Hardness of Selected Wood Flooring Species

The Janka (or side) hardness test measures the force required to embed a .444 – inch steel wall to half its diameter in wood. It is one of the best measurements of the ability of a wood species to withstand denting and wear. By the same token, it is also a good indicator of how hard or easy a species is to saw or nail. Northern Red Oak, for example, has a Janka hardness rating of 1290. Brazilian Cherry, with a rating of 2350, is nearly twice as hard. If you’re accustomed to working with Red Oak and decide to tackle a job with Brazilian Cherry, you can expect it to be much harder to cut and nail.

Wood Species Rating
Ipe 3680
Brazilian Teak 3540
Brazilian Cherry (jatoba) 2820
Live Oak 2680
Purpleheart 2520
Spotted Gum 2473
Mesquite 2345
Santos Mahogany 2200
Sydney Blue Gum 2023
Merbau 1925
Jarrah 1910
Hickory/Pecan 1820
Padauk 1725
Wenge 1630
Brazilian Maple 1500
Sapele 1500
Hard Maple 1450
Australian Cypress 1375
White Oak 1360
Tasmanian Oak 1350
White Ash 1320
Beech 1300
Red Oak (Northern) 1290
Birch 1260
Iroko 1260
Antique Heart Pine 1225
Thai/Burmese Teak 1078
American Black Walnut 1010
Black Cherry 950
Southern Yellow Pine (Longleaf) 870
Southern Yellow Pine (Loblolly & Shortleaf) 690
Douglas Fir 660

.Source: Hardness ratings for most species taken from Wood Handbook: Wood as an Engineering Material (Agriculture Handbook 72, Forest Product Laboratory, Forest Service U.S. Department of Agriculture; revised 1987). Except for Australian Cypress, Wenge, African Padauk, Merbau and Santos Mahogany, which were provided by International Hardwood Flooring; Heart Pine by Mountain Lumber and Mesquite by Mesquite Products of Texas.

Douglas Fir rating is an average of ratings for coast, Interior West and Interior North species.

Relative Stability of Selected Wood Flooring Species

(Ranked by percentage of tangential shrinkage from green to oven-dry moisture content)

The numbers in the chart reflect the dimensional change coefficient for the various species, measured as tangential shrinkage or swelling within normal moisture content limits of 6 – 14 percent. Tangential change values will normally reflect changes in plainsawn wood. Quartersawn wood will usually be more dimensionally stable than plainsawn.

The dimensional change coefficient can be used to calculate expected shrinkage or swelling. Simply multiply the change in moisture content by the change coefficient, than multiply by the width of the board.

Example: A mesquite (change coefficient – .00129) board 5 inches wide experiences a moisture content change from 6 to 9 percent – a change of 3 percentage points.

(Calculation: 3 x .00129 = .00387 x 5 = .019 inches).

In actual practice, however, change would be diminished in a complete floor, as the boards’ proximity to each other tends to restrain movement. The chart is best used for comparison.

* Although some tropical woods such as Australian Cypress, Brazilian Cherry, Merbau and Wenge appear in this chart to have excellent moisture stability compared to domestic oak, actual installations of many of these woods have demonstrated significant movement in use. To avoid problems later, extra care should be taken to inform potential users of these tendencies prior to purchase.

Wood Species Rating
Beech 11.9
Jarrah 11.0
White Oak 10.5
Hard Maple 9.9
Yellow Birch 9.5
Hickory/Pecan 8.9
Brazilian Maple 8.8
Northern Red Oak 8.6
Brazilian Cherry (jatoba) 8.5
Bubinga 8.4
Brazilian Walnut (Ipe) 8.0
White Ash 7.8
American Black Walnut 7.8
Brazilian Teak 7.6
Southern Yellow Pine 7.5
Sapele 7.4
Douglas Fir 7.3
Black Cherry 7.1
Santos Mahogany 6.2
Purpleheart 6.1
Thai/Burmese Teak 5.8
Wenge 5.8
Padauk 5.2
Merbau 4.6
Iroko 3.8
Mesquite 3.2
Australian Cypress 2.8

.Source: stability ratings taken from Wood Handbook: Wood as an Engineering Material (Agriculture Handbook 72, Forest Products Laboratory, Forest Service, U.S. Department of Agriculture; revised 1987).