DIY Decorations with Wood Slices – Part 3

Using Big Wood Slices

The following blogs are a three-part series where we can dive into some great DIYs using some leftover branches and create some artful wood slices decor.

Welcome back to the final three-part series of DIY decorations with leftover wood slices. For the past two months, we’ve dived into DIYs using smaller wood slices. That’s all good and helpful when you have leftover branches form trimming a bush but, what if you come by some bigger branches? This DIY is for those one-in-a-long-while findings when you or a neighbor is cutting down a bigger tree branch.  Alternatively, you can easily buy these bigger slices at a store, let’s start prepping for bigger and better DIY decorations with even bigger slices.

Go big or go home!

Chalkboard Message

Make your season’s decorations pop with a thoughtful message, announce the day’s menu or just leave fun messages for your family. An extra plus is, you don’t need a single bone of calligraphy experience on you to make these amazing messages. Here is what you’ll need:

Before we start you want to make sure your wood slice is sanded down to a smooth finish. If you purchased the wood slice it most likely be sanded down already. But if you got it from nature directly, you want to make sure to do so. A smooth surface is recommended for the chalkboard paint. You can follow the original DIY Wood Slice Chalkboard tutorial here.

  1. Using the Painter’s tape, frame the area you want to paint with the chalkboard paint. You can make it a square or follow the edge or the wood slice. 
  2. Follow the application instructions of the chalkboard paint. Most likely it will ask you to paint two coats, one painting horizontally and another vertically, letting it dry in between coats. Finally, let it dry completely for 24 hours.
  3. While it’s drying you can look for a design you want to have on the board. Google a message you would like to transfer on to your board. You can look for “holiday calligraphy” or “kitchen typography.” Alternatively, you can open a Word document and type your message using their fronts. We are going to use the image as a stencil, so you don’t need to worry about the color or if the edges aren’t sharp.
  4. Before you print make sure to resize the message. If you chose an image you can open this image in Word or Photoshop and scale it so it fits the size of your wood slice.
  5. Take your printed-out message and flip it upside down. Rub chalk all over the backside of the letters.
  6. Flip it over again and place it gently over your chalkboard. Using a pencil, or a mechanical pencil with no led, trace the edges of the letters. Press hard enough for the paper to touch the wood but not too hard that you tear the paper.

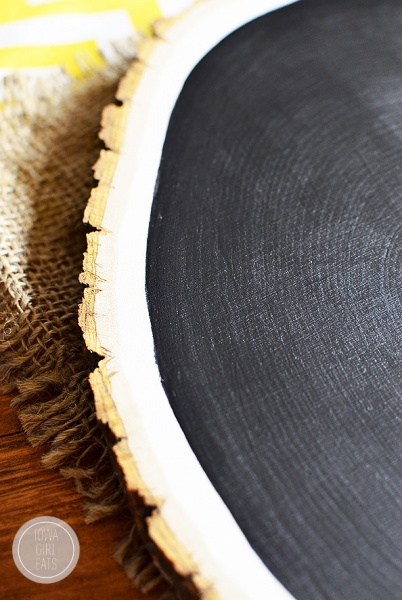
As mentioned in the video, you can use chalk or a chalk marker, and wipe any excess chalk dust using a wet Q-tip.

Hanging Plant Stand

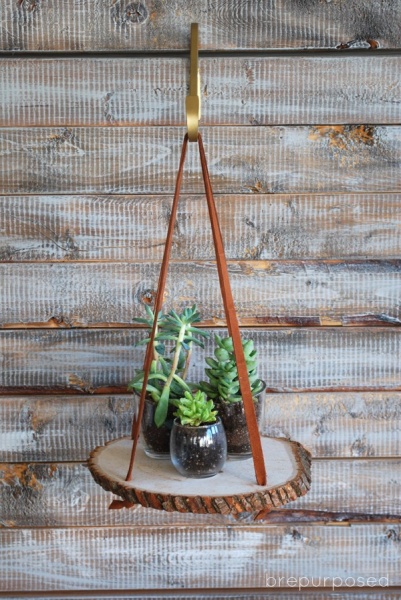
A little green in your house brings peace and helps clean the air.

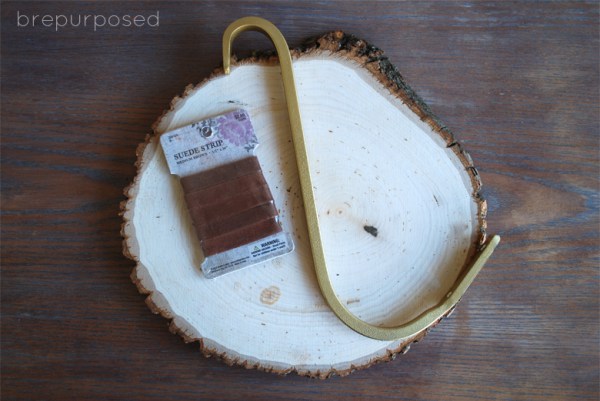
This next DIY can make statement piece with just a few items. You can find the original DYI Hanging Wood Slice Plant stand tutorial here. Below is what you’ll need:

This is a very small DIY but it takes a bit of labor:

  1. First, you have to drill four holes in the wood slice. Use a drill bit that is 9/64 and 1/4 in size.
  2. Pull all the ends of the suede strings through the holes and make a knot on the bottom. The suede strips will act like the straps to a bag. Whichever string you choose to use, make sure you will be able to tie knot that will work as a stopper and won’t run through the whole.
  3. Next, drill the plant hanger into your desired wall -whether you choose to place it outside or indoors. In the Original tutorial, the hanger was spray-painted gold, which made the planter stand out and look even better.
  4. Last but not least, choose your plants. From the same tutorial, succulents were used as these can stay small and won’t weight too much.

Mesquite Wood Stair Parts & Components

Mesquite wood displays rich character and color not found in other hardwoods. The handsome appearance, unparalleled strength and rustic Texas style complete a grand entrance for any stairway. Faifer and Company, Inc supplies a full range of artfully-crafted mesquite wood stair parts to complete simple and elaborate staircases of all varieties.

Faifer and Company’s mesquite wood selections are reclaimed pieces from Texas ranchlands, carefully chosen for their aged charm and inimitable detail. The individual pieces combine to create a striking impression and complementary Texas motif in your foyer, living room or basement. An extensive selection of sizes with nosings, risers and reducers allows you to create any staircase and fulfill your unique elevation, height and aesthetic requirements.

Browse the stair gallery to take a closer look at completed mesquite wood staircases. See the parts listed below to start building your staircase and contact Faifer and Company Inc. for distinctive wooden stair treads and risers in Texas.

Stair Gallery

Mesquite Nosings – 1 1/16″ x 3 ½” x Random Length – Mill Run

Mesquite Risers – 3/4″ x 8″ x Random Length – Mill Run

Mesquite Treads – 1 1/16″ x 12″ x Random Length – Mill Run

Mesquite Reducers – ½” x 3” x Random Length – Mill Run

Mesquite T-Moulding- ½” x 1 7/8” x Random Length – Mill Run

Mesquite Flooring Basic Installation

Concrete Sub‐floor Glue Down

  • Moisture test concrete sub‐floor.
  • Float floor flat to ¼” inch in an 8 foot radius
  • Using a 1/8”x¼”x¼” square notched trowel, spread adhesive over a 2 foot by 2 foot area. Install planks in adhesive and continue process until entire area is installed.
  • Roll floor with 50 lb. To 80 lb. roller to make sure adhesive makes good contact with flooring. Do not allow traffic for a minimum of 8 hours on floor or as recommended by Manufacturer of adhesive.
  • Let adhesive set up overnight before starting the sanding process.
  • Sand with 60 grit paper to flatten.
  • Apply Filler (Wood Flour with floor sawdust mix) or you can use cherry or black walnut wood fill to fill cracks. If filling large cracks and knots you can use System Three epoxy for a more natural appearance.
  • Sand with 80 grit to flatten filler, finish with 120 grit.
  • Seal floor with floor polyurethane such as Dura Seal, Waterlox or Tung Oil per manufactures recommendations

Hardwood Flooring Grade Description

Strip Wood Flooring

#1 and Better

Will have clear and possibly small knots, checks and other natural defects allowed, along with the natural varying color of the wood. Sapwood is not allowed on finished surfaces. Lengths vary from 9 inches to 48 inches with tongue and groove. Ends are square cut. On average the lengths will vary between 16″ – 22″.

Mill Run

Will have semi clear, small to large knots, checks and other natural defects allowed, along with the natural varying color of the wood. Sapwood is not allowed on finished surfaces. Lengths vary from 9 inches to 48 inches with tongue and groove. Ends are square cut. On average the lengths will vary between 16″ – 22″.

End Grain Flooring

Wood Blocks – Only one grade available.  Knots, checks and other natural defects are allowed. Partly filled with black epoxy.  Width is 3 inches and lengths from 2 inches to 5 inches.

Products are 1/2 inch in thickness.
All material is of 100% South Texas origin.

Mesquite Wood Flooring Hardness & Stability

Relative Hardness of Selected Wood Flooring Species

The Janka (or side) hardness test measures the force required to embed a .444 – inch steel wall to half its diameter in wood. It is one of the best measurements of the ability of a wood species to withstand denting and wear. By the same token, it is also a good indicator of how hard or easy a species is to saw or nail. Northern Red Oak, for example, has a Janka hardness rating of 1290. Brazilian Cherry, with a rating of 2350, is nearly twice as hard. If you’re accustomed to working with Red Oak and decide to tackle a job with Brazilian Cherry, you can expect it to be much harder to cut and nail.

Wood Species Rating
Ipe 3680
Brazilian Teak 3540
Brazilian Cherry (jatoba) 2820
Live Oak 2680
Purpleheart 2520
Spotted Gum 2473
Mesquite 2345
Santos Mahogany 2200
Sydney Blue Gum 2023
Merbau 1925
Jarrah 1910
Hickory/Pecan 1820
Padauk 1725
Wenge 1630
Brazilian Maple 1500
Sapele 1500
Hard Maple 1450
Australian Cypress 1375
White Oak 1360
Tasmanian Oak 1350
White Ash 1320
Beech 1300
Red Oak (Northern) 1290
Birch 1260
Iroko 1260
Antique Heart Pine 1225
Thai/Burmese Teak 1078
American Black Walnut 1010
Black Cherry 950
Southern Yellow Pine (Longleaf) 870
Southern Yellow Pine (Loblolly & Shortleaf) 690
Douglas Fir 660

.Source: Hardness ratings for most species taken from Wood Handbook: Wood as an Engineering Material (Agriculture Handbook 72, Forest Product Laboratory, Forest Service U.S. Department of Agriculture; revised 1987). Except for Australian Cypress, Wenge, African Padauk, Merbau and Santos Mahogany, which were provided by International Hardwood Flooring; Heart Pine by Mountain Lumber and Mesquite by Mesquite Products of Texas.

Douglas Fir rating is an average of ratings for coast, Interior West and Interior North species.

Relative Stability of Selected Wood Flooring Species

(Ranked by percentage of tangential shrinkage from green to oven-dry moisture content)

The numbers in the chart reflect the dimensional change coefficient for the various species, measured as tangential shrinkage or swelling within normal moisture content limits of 6 – 14 percent. Tangential change values will normally reflect changes in plainsawn wood. Quartersawn wood will usually be more dimensionally stable than plainsawn.

The dimensional change coefficient can be used to calculate expected shrinkage or swelling. Simply multiply the change in moisture content by the change coefficient, than multiply by the width of the board.

Example: A mesquite (change coefficient – .00129) board 5 inches wide experiences a moisture content change from 6 to 9 percent – a change of 3 percentage points.

(Calculation: 3 x .00129 = .00387 x 5 = .019 inches).

In actual practice, however, change would be diminished in a complete floor, as the boards’ proximity to each other tends to restrain movement. The chart is best used for comparison.

* Although some tropical woods such as Australian Cypress, Brazilian Cherry, Merbau and Wenge appear in this chart to have excellent moisture stability compared to domestic oak, actual installations of many of these woods have demonstrated significant movement in use. To avoid problems later, extra care should be taken to inform potential users of these tendencies prior to purchase.

Wood Species Rating
Beech 11.9
Jarrah 11.0
White Oak 10.5
Hard Maple 9.9
Yellow Birch 9.5
Hickory/Pecan 8.9
Brazilian Maple 8.8
Northern Red Oak 8.6
Brazilian Cherry (jatoba) 8.5
Bubinga 8.4
Brazilian Walnut (Ipe) 8.0
White Ash 7.8
American Black Walnut 7.8
Brazilian Teak 7.6
Southern Yellow Pine 7.5
Sapele 7.4
Douglas Fir 7.3
Black Cherry 7.1
Santos Mahogany 6.2
Purpleheart 6.1
Thai/Burmese Teak 5.8
Wenge 5.8
Padauk 5.2
Merbau 4.6
Iroko 3.8
Mesquite 3.2
Australian Cypress 2.8

.Source: stability ratings taken from Wood Handbook: Wood as an Engineering Material (Agriculture Handbook 72, Forest Products Laboratory, Forest Service, U.S. Department of Agriculture; revised 1987).